 My frequent trips to Bangalore kept me On and Off from blogging from the last one month.My trips were quite joyful with few family functions,get together's and I also had a great time eating at my favorite joints which I miss so much here in Mumbai.I hope I will be regular in blogging from now onwards without any break's in between.
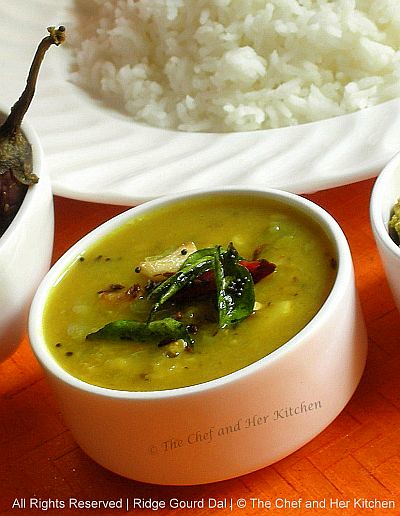
And coming to today's recipe this ridge gourd dal is very simple and tastier one which is truely done in Andhra style.Dal/pappu has a very prominent place in regular Andhra meal either it is paired with greens or vegetables or just a simple plain dal.Ridge gourd is one vegetable which can be utilized completely without any wastage.Peeled ridge gourd is used either in stew, dal, kootu where as the peels of ridge gourd are used to make pacchadi(chutney) which goes very well with rice.You can check the recipe for Ridge gourd pacchadi here.
Ingredients:
1 small tender ridge gourd/beerakaya
1 medium sized onion,roughly chopped
1/2 cup heaped toor dal/yellow lentils
4-5 green chillies,slit
1 tsp coriander powder
1/2 tsp cumin seeds powder
a generous pinch of turmeric powder
1 tbsp oil
salt to taste
for tadka:
4-5 garlic pods
2 broken red chillies
a sprig of curry leaves
1 tsp mustard seeds
1/2 tsp cumin seeds
a pinch of hing
1 tsp ghee/oil
 Method:
- Peel the ridge gourd and cut into small cubes.Check whether the ridge gourd is bitter or not before proceeding further making it.If it is bitter discard it and use another one.
- Wash toor dal and soak it in water for some time.
- Heat oil in a kadai or pressure cooker and add chopped onions and green chillies and fry until they are translucent.
- Add ridge gourd pieces and fry for few minutes and add soaked toor dal and add coriander powder,jeera powder and turmeric and mix well.
- Transfer this mixture into a vessel that fits in the pressure cooker(or if you are doing it in the pressure cooker directly,you can skip this step).Add enough salt and water and pressure cook for 3 whistles and switch off the flame.
- Mean while heat a small tadka pan and add ghee/oil to it and crackle mustard seeds and cumin seeds.Add slightly crushed garlic,red chillies and hing and fry for few seconds and add curry leaves and switch off the flame.
- After the pressure drops down turn on the heat again and pour the prepared tadka over it and mix well and let it come to a boil once and switch off the flame.
Note:
- For a Vegan version use only oil instead of ghee in the recipe.

that looks like an amazing meal
ReplyDeleteHey.. Prathibha how are you ?.. Beerakaya pappu looks simply awesome and delicious.. very beautiful presentation dear.. and gutti vankaya kooda super ga vundi.. Thanks for sharing :)
ReplyDeletePrathibha, this combo makes a satisfactory good meal,thanx for sharing..
ReplyDeleteWhat a tempting platter..hearty n comforting meal!
ReplyDeleteUS Masala
welcome back Prathibha . Dish looks yummy ...
ReplyDeletethe dal is so tempting pic are nice but i have to ask which is seen in rice what is that stuffed mirch that looks awesome do visit
ReplyDeletesantoshbangar.blogspot.com
love that meal with that stuffed eggplant at the sides. never had ridgegourd dal but it looks awesome...this tempering seems very very flavourful.
ReplyDeletepicture is very tempting Prathibha
ReplyDeleteDroolworthy pappu, makes me hungry..was wondering where u have been, glad u had a wonderful trips and get togethers..
ReplyDeleteWonderful meal..curry looks awesome, beautiful presentation
ReplyDeleteLooks soo good and delicious!!
ReplyDeleteThis meal makes me drool ..... yummmm
ReplyDeleteCheers n Happy Cooking,
Satrupa
http://satrupafoodforthought.blogspo.com
Hi Prathy,
ReplyDeleteThe berakka pappu lloks so warm and inviting...Yummy...love the way you have presented...beautiful clicks..
Dr.Sameena@
www.myeasytocookrecipes.blogspot.com
looks so mouth-watering!! Yum!!
ReplyDeleteWow! What a meal! I especially love those stuffed brinjals! Beautiful pics!
ReplyDeletenever tried peerkangai in gravy. This sounds very nice and ovely presentation.like the stuffed brinjal behind
ReplyDeletenice recipe & delicious too
ReplyDeleteFulfilling meal. Love the first pic.
ReplyDeleteSimple and comforting dal recipe.
ReplyDeletenice dish and yummy presentation dear
ReplyDeleteThats yummy dhal and brinjal curry.. very comforting meal.. This really makes me hungry...
ReplyDeleteHi, I made this pappu and it turned out to be excellent. Thanks so much for the recipe!
ReplyDelete